How to connect cursive letters - a complete guide to joins
Joins are the part of cursive that most people learn least well. Letter shapes get taught carefully, one at a time, with models to trace. Joins tend to get taught as a single instruction: now connect them. And then the learner is left to work out why on flows easily while ve keeps collapsing into a scribble.
The good news is that joins are not 676 separate things to memorise, one for every pair of letters. Almost every connection in cursive follows one of four patterns, and once you can make each pattern reliably, the whole alphabet opens up. This guide goes through the four patterns, the handful of genuinely awkward combinations, and a practice sequence that builds joins in the right order.
One note before starting. Cursive styles differ, and so do their joining rules. This guide describes the looped cursive taught in most British and American schools. If you are following a specific school scheme or curriculum, let its models win any disagreement with what you read here. The patterns below will still map onto whatever style you are using.
Where joins come from
A join is not a separate stroke you add between two letters. It is the exit stroke of one letter meeting the entry stroke of the next, so smoothly that they become a single line.
Every cursive letter ends with an exit stroke, a small curve that leaves the letter travelling to the right. Every cursive letter begins with an entry stroke that arrives from the left. When you write two letters in sequence, the exit of the first becomes the entry of the second. That is the entire mechanism.
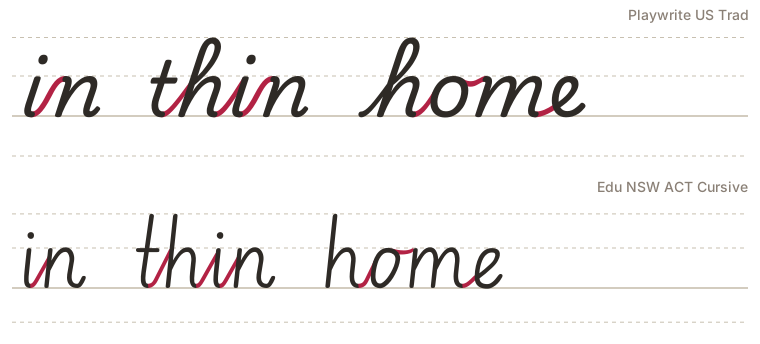
This is why joins feel impossible when the individual letters are shaky. If your letters do not end in a consistent place, every join starts from a different position and no pattern can form. If your joins are fighting you, the first thing to check is whether your exit strokes are consistent, and the second is whether your letters are a consistent height. Fix those two things and most joining problems shrink on their own.
Watch where your letters end, not where the next one begins. Nearly all join problems are exit-stroke problems wearing a disguise.
The four join patterns
Every letter in cursive finishes in one of two places: at the baseline, or up at the top of the x-height. And every following letter is one of two kinds: a short letter that lives between the baseline and the x-height, or a letter with an ascender that reaches up to the top line. Two starting points, two destinations. That gives four join patterns, and they cover almost everything you will ever write.
1. Diagonal join to a short letter
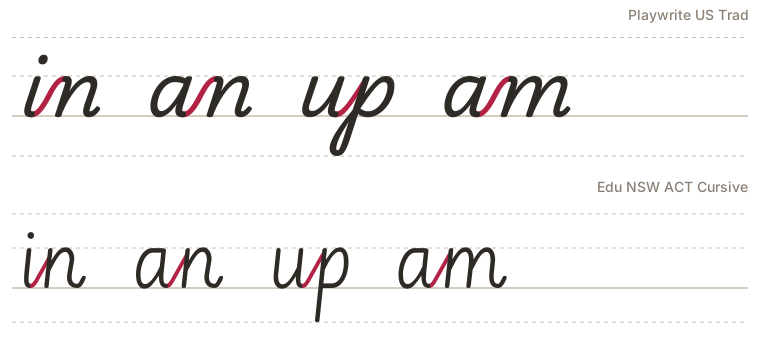
This is the workhorse of cursive, and the join to learn first. A letter that finishes at the baseline, like a, i, n, or u, connects to a following short letter with a smooth diagonal stroke that rises from the baseline to the top of the x-height.
You already know this stroke. It is the same upward curve as the entry stroke you learned with your first cursive letters. The pairs in, an, up, and am are all pure examples of this join. Practise in until the diagonal feels like one movement rather than an ending followed by a beginning.
2. Diagonal join to an ascender
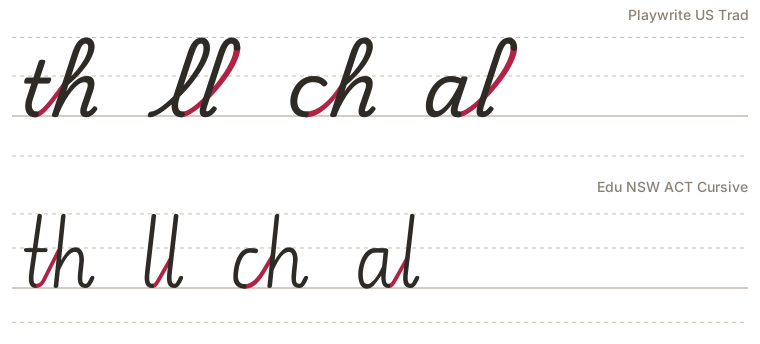
The same diagonal stroke, but the destination is taller. When the following letter has an ascender, like l, h, k, b, or t, the joining stroke continues past the x-height and travels up toward the ascender line, where it turns into the loop or downstroke of the tall letter.
The pairs th, ll, ch, and al are all this pattern. The common fault here is running out of conviction halfway up, which produces tall letters that are not actually tall. The join should carry you all the way to the ascender line in one movement. If your h after a t keeps coming out short, the problem is the join stroke stopping early, not the h itself.
3. Horizontal join to a short letter
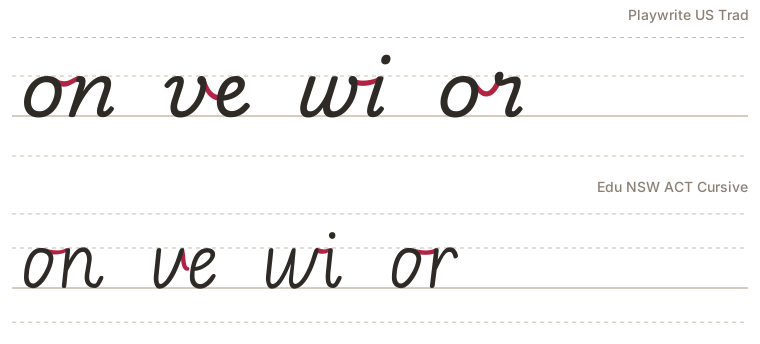
Four letters do not return to the baseline when they finish: o, r, v, and w all end at the top of the x-height. From there, the join to the next letter travels horizontally rather than diagonally, a small bridge across the top of the writing.
The pairs on, ve, wi, and or are all horizontal joins. They feel strange at first because the following letter has to begin from the top instead of from the baseline, and its shape compresses slightly to accept that. An e after a v starts from the bridge and forms a smaller loop than an e arriving from below. This is normal. The letter is adapting to its neighbour, which is what fluent cursive does everywhere.
4. Horizontal join to an ascender
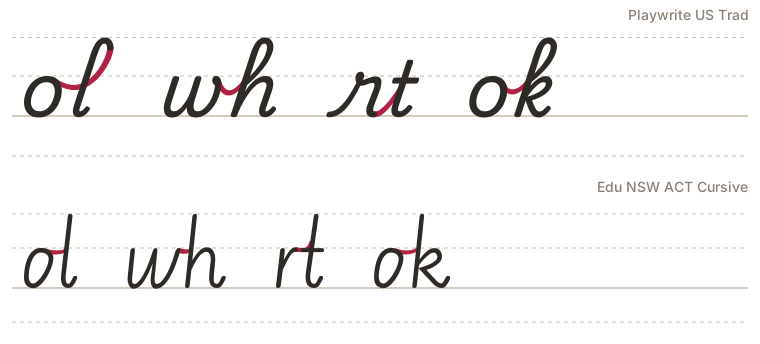
The rarest of the four, and the one that trips up even confident writers. A top-finishing letter connects to a tall letter: ol, wh, rt, ok. The bridge stroke leaves the top of the first letter and rises to the ascender line.
The difficulty is that there is very little horizontal distance in which to gain a lot of height, so the stroke is steeper than it looks in models. Take it slowly. The pair wh is worth particular attention because of how often English uses it.
Joining into round letters
There is one more situation worth treating on its own, because it cuts across all four patterns: joining into the round letters a, c, d, g, o, and q.
Round letters begin at the top of their oval, on the right-hand side, and travel counterclockwise. But joins arrive travelling rightward and upward. So the joining stroke cannot simply flow into the letter the way it flows into an i or an n. It has to travel up and over, arriving at the top of the oval, and then reverse direction to draw the oval itself.
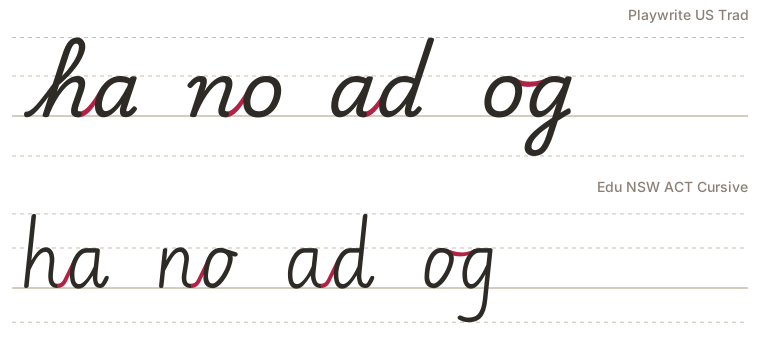
In practice this means the join into a round letter contains a small moment of retrace: the stroke rises to where the oval begins, and the first part of the oval doubles back over it. Pairs like na, ca inside a word, or ho all contain this move. If your ovals keep coming out open at the top after a join, you are starting the oval where the join happens to land rather than carrying the stroke all the way up to the oval's true starting point.
This is the single most common joining fault, and it is worth a week of patient attention on its own. The pairs ha, no, ad, and og make a good drill set.
The letters that behave badly
A few letters have their own rules, and it is easier to learn them as characters than to force them into the patterns.
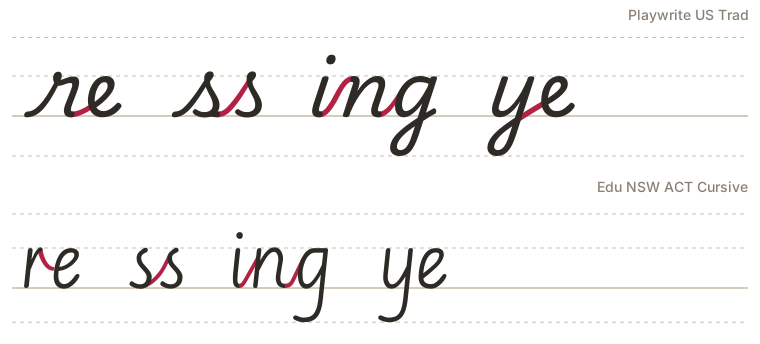
The letter r is the most notorious. In looped cursive, r finishes at the top, so everything after it is a horizontal join, and its own shape changes subtly depending on what came before. Most people's cursive r is the weakest letter in their alphabet. Isolate it: practise re, ra, and ri as deliberate drills rather than hoping r improves inside whole words.
The letter s changes shape more than any other letter when it joins. A standalone cursive s and an s in the middle of a word can look like different characters, because the joined form closes with a small tail at the baseline. Write ss, st, and es slowly and let the joined form establish itself as its own shape.
The descender letters g, j, and y finish below the baseline, but their loops swing back up and cross at the baseline, and the join continues from that crossing point. This works smoothly once it is automatic, but at first the loop and the join compete for attention. The pairs ing and ye are good practice, and ing is arguably the most valuable single drill in English cursive, since it combines a diagonal join, a descender loop, and one of the most frequent letter sequences in the language.
Finally, some letters may not join at all, depending on your style. Many schemes leave x and z unjoined, and most leave capital letters unjoined to the rest of the word. A small pen lift in these places is not a failure of cursive. It is part of the style. Fluent adult handwriting almost always contains a few strategic lifts, and writing that never lifts the pen is a party trick, not a goal.
If your school or curriculum uses a continuous cursive scheme, it will have its own rulings on which letters join and which do not. Follow the scheme. Consistency within one style matters far more than which style it is.
A practice sequence that works
Joins reward a patient, ordered approach more than almost any other part of handwriting. Here is a sequence that builds them properly.
- Confirm your exit strokes. Write a line each of n, a, i, and u and check that every letter ends with the same small rightward curve at the same height. This is the foundation everything else sits on.
- Diagonal joins to short letters: in, an, un, am, ni. A line of each, slowly.
- Diagonal joins to ascenders: th, al, ch, ll. Watch the height.
- Horizontal joins: on, or, ve, wi, wh. Expect these to take longer, and let the letter after the bridge compress naturally.
- Joins into round letters: ha, no, ad, ca. Carry the stroke all the way to the top of the oval.
- The awkward squad: re, ss, ing, ye. Short daily drills.
- High-frequency pairs. The combinations th, he, in, er, an, re, on, en, and at account for a remarkable share of all the joins you will ever write. Getting these nine smooth transforms how your everyday writing feels.
- Whole words, chosen to mix join types: thin, rain, home, over, write, bring, quiet.
Spend a few days on each stage rather than a few minutes. Moving on before a stage is settled just means revisiting it later with bad habits attached.
Print-ready joining practice
If you would rather start from prepared sheets than the generator, these cursive worksheets include joined words and full sentences with tracing guides.

Basic cursive text
Short texts written in basic cursive on four-line guides. Each line is shown as a dotted tracing row followed by an empty guided line for independent copy practice.

Basic cursive - By shape group
Cursive letters grouped by shared stroke shapes on four-line guides. Each group includes dotted tracing rows followed by empty guided lines for copy practice.


Advanced cursive drills
Second-tier drills for when the basics feel settled: small e loops, alternating le loops, sustained arches, the compound curve of s, the letter f, figure eights and the rhythm word minimum. Dotted rows to trace, empty rows to repeat freehand.
When joins finally disappear
There is a stage, usually a few weeks in, where joins stop being something you do and become something that happens. You stop thinking about the diagonal into the h and just write the. This is the point of all the drilling, and it arrives more suddenly than you expect.
Until then, slow is the whole method. A join practised slowly and correctly ten times teaches more than the same join scrawled fifty times at speed. Cursive was designed to flow, and flow is not rush. Give each pair its time, let the patterns settle, and the connections will start making themselves.